
Semi-automated Cold Emailing Guide with High Deliverability

If you want to scale your cold email sending efforts, relying on traditional email providers like Zoho, Google Workspace, or Outlook isn't the answer. While these services work well for personal and business communications, they're not optimized for mass email sending and can quickly become bottlenecks as your volume grows.
Why Traditional Email Providers Fall Short for Scaling
Zoho Mail, Google Workspace, and Outlook are excellent for day-to-day business communications, but they have significant limitations when it comes to scaling email operations.
Sending Limits: Most traditional providers cap your daily sending at 500-2,000 emails per day, regardless of your plan tier. This simply doesn't scale for businesses that need to send thousands or tens of thousands of emails.
Deliverability Issues: When you send large volumes through standard email services, inbox providers (Gmail, Outlook, Yahoo) often flag your emails as suspicious, leading to poor deliverability rates.
Lack of Analytics: Traditional email services provide basic delivery confirmation but lack the detailed analytics needed to optimize campaigns—open rates, click-through rates, bounce analysis, and spam folder placement.
No Automation Features: Standard email providers don't offer the automation, segmentation, and personalization features that modern businesses need for effective email marketing.
IP Reputation Risks: Sharing IP addresses with other users means your sending reputation can be damaged by others' poor practices.
The Self-Hosted SMTP Server
For maximum control and cost efficiency, you can deploy your own SMTP server and pay only for hosting costs. However, this approach requires significant technical expertise:Deliverability Challenges: You'll need to:
- Warm up IP addresses properly
- Maintain sender reputation
- Handle bounce management
- Monitor blacklists
- Configure proper authentication
- Manage relationships with inbox providers
As we can see, maintaining high-availability email infrastructure, monitoring performance, and scaling capacity requires dedicated resources. While self-hosting can be cost-effective for very high volumes, most businesses find that specialist SMTP providers offer better value when factoring in the time and expertise required.
Why Specialist SMTP Providers Excel
Professional SMTP providers are purpose-built for scale and offer significant advantages. Designed to handle millions of emails with robust servers and delivery networks, they provide the following Features:
- Dedicated IP addresses to protect your sender reputation
- Domain authentication (SPF, DKIM, DMARC) setup assistance
- Inbox placement monitoring and optimization
- Automatic bounce and unsubscribe handling
- Spam complaint management
- Delivery rates by inbox provider
- Open and click tracking
- Geographic and device-based analytics
- A/B testing capabilities
- Real-time performance monitoring
Choosing the Right SMTP Provider
There are numerous professional SMTP providers to choose from, each with different strengths. For businesses that want to start with a fair free plan and to scale their email operations, Mailtrap offers the best combination of features, reliability, and cost-effectiveness as you grow. Their free tier provides 1,000 emails per month, and their pricing structure remains affordable as your volume increases, making it an ideal platform to grow with rather than outgrow.
Getting Started with Mailtrap
Step 1: Create Your Account
- Visit mailtrap.io and sign up for a free account
- Verify your email address and complete the account setup
- Access your Email Sending dashboard
Step 2: Add and Verify Your Domain
- In your Mailtrap dashboard, navigate to "Sending Domains"
- Click "Add Domain" and enter your domain name
- Follow the DNS configuration instructions provided:
- Add the required CNAME, TXT (SPF), and DKIM records to your DNS
- Set up DMARC record for enhanced deliverability
- Wait for domain verification (usually takes 15-30 minutes)
Step 3: Generate SMTP Credentials
- Go to "SMTP/API Settings" in your dashboard
- Your SMTP credentials will be displayed:
- SMTP Server: live.smtp.mailtrap.io
- Port: 587 (TLS) or 2525 (TLS alternative)
- Username: Your Mailtrap username (usually starts with your email)
- Password: Your account password
- Copy these credentials for use in your email client or application
Step 4: Test Your Setup
- Use Mailtrap's built-in email tester to send test emails
- Monitor delivery status and analytics in your dashboard
- Check spam placement and deliverability metrics
With your SMTP credentials, you can use Semi-Blast Email Client to send emails on your behalf with templates (either in bulk or one by one) or without templates.
Set Up a Semiblast Account
- Open Semi-Blast Email Client and click "Sign in" to create an account or sign in if you have one.
- Go to the account settings or the initial setup page by clicking on your avatar or on the icon with the first letter of your name.
- In the opened menu, click on the "SMTP details" menu item and fill the fields like this:
- SMTP Server: live.smtp.mailtrap.io
- Port: 587
- Secure (SSL/TLS) ✓
- Username: Your Mailtrap username
- Password: Your account password
- Click on "Save Settings" and close the dialog.
Manual Email Sending
Your VA can start writing and sending emails right away by using the widget on the right side of the main window of Semiblast application.


Automated or Semi-automated Email Sending
For automated or semi-automated mode you need to either load a template or a CSV/Excel file containing email data. If you already have a template and you upload a data file, you will be requested to map columns to template variables, so that the application would know how to fill the template variables. On the other hand, if you upload a spreadsheet without first uploading a template file, the columns will be used as template variables and the types of the templates will be decided by the data in their cells.
Upload a YAML template
Uploading a YAML file is the way to go if you want to send templated emails one by one or if you want to dictate a template for all kinds of email data files that you will upload to send later.
Create and upload a YAML template defining your email’s body template and the variables (e.g., website url, flags for enabling personalized messages, etc.). In order to get an idea of how the YAML file should look like, you can download a template file by clicking the "Download a simple template file" button.

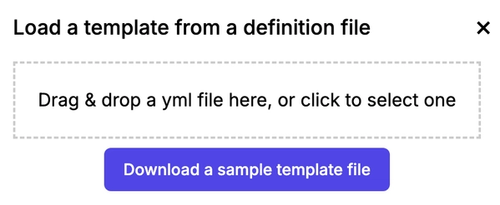
After modifying the file to your needs, you can upload it using the same dialog. The template will be available for editing on the right side of the widget.

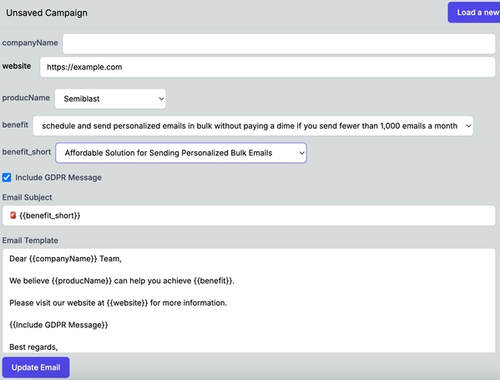
After this step, your VA can change the template variables for each email and click the "Update email" button. This will fill the subject and body of the pending email. After reviewing that the template is okay and the variables are loaded perfectly into the templates, the VA can hit the "Send" button. This will send the email and the next email will be formed from the templates.
This is a great way to test templates, to check open rates, conversion rates, etc., before going to automated mode. For automated mode, you need to have a spreadsheet with email addresses and with all the required template variables. The next section will talk about how to upload a spreadsheet and how to use it.
Upload a CSV/Excel Spreadsheet
You can upload it by clicking "Load a template and data from an xlsx, csv file" or "Load data from an xlsx, csv file" depending on whether you have a loaded template already or not.
If you don't have a spreadsheet with data and you want to get inspiration on how to fill it, you can download a sample file by clicking on the button at the bottom of the dialog.


After uploading the file, you will be asked to map spreadsheet columns to the template variables if you have an uploaded template file already.

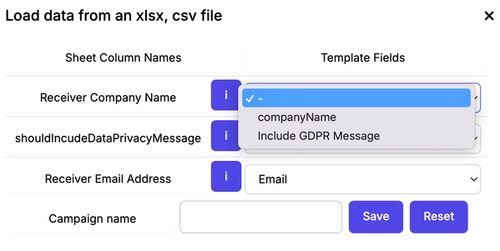
Or if you are starting with a clean sheet, oh sorry, if you are uploading a spreadsheet without having a defined template, you will need to specify the types of the columns in this dialog.

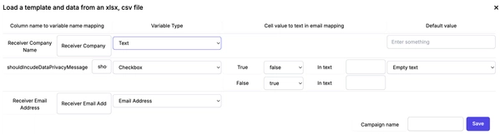
Note that in either case, if you don't specify the recipient address column, you will not be able to bulk send emails. You can only send one by one because your VA will need to fill email addresses before sending. You will also need to have non-empty body template and subject template to be able to send the emails in bulk.
Sending Emails loaded from a Spreadsheet
When emails can be sent in bulk, the following buttons will be visible in addition to the "Send" button.


The app will generate personalized emails for each row in your data file, using the templates and variables.
Your VA can review and send each email one by one, ensuring a personal touch and avoiding spam filters. Send operations will also fill templates with the next row's data, and will populate the recipient email address, the email subject, and the body. So, in most cases, the VA will review the resulting texts and will hit the "Send" button. Easy task, isn't it?
Not only can the VA improve the subject and the email body for the current email to be sent, but they can also modify the templates so that the upcoming emails can be generated with the changed template.
After the templates are polished, the rest of the rows can be bulk sent or blasted with one click. Of course, the blasting can be done from the first row.
For this, it makes sense to check all email texts before hitting the "Blast" button. That's what the 'Dry Run' feature is for. When you or your VA click on the "Dry Run" button, it will download a report file containing the email subject, body, and recipient's email address for each row of the originally uploaded spreadsheet.
You can manually check the rows for error patterns like multiple whitespaces, no whitespaces between words, unresolved template variables, etc. After fixing the input spreadsheet, the way it is mapped, and the templated texts, you can continue dry sending the emails. When you are completely happy with the result of the "Dry Run", you can hit the "Blast" button. All emails will be sent with the configured delay. You can leave the app and monitor the sent emails on Mailtrap website.